

Summary
We'll walk you through exactly how to set up Browse Abandonment emails from your Shopify store on Klaviyo.
Today, I'm going to show you how to set up Web tracking in your Klaviyo account so that you can track which consumers have been browsing your business.
To begin, head to the upper right hand corner of your Klaviyo account. Go ahead and select Set up Web Tracking from the dropdown menu.
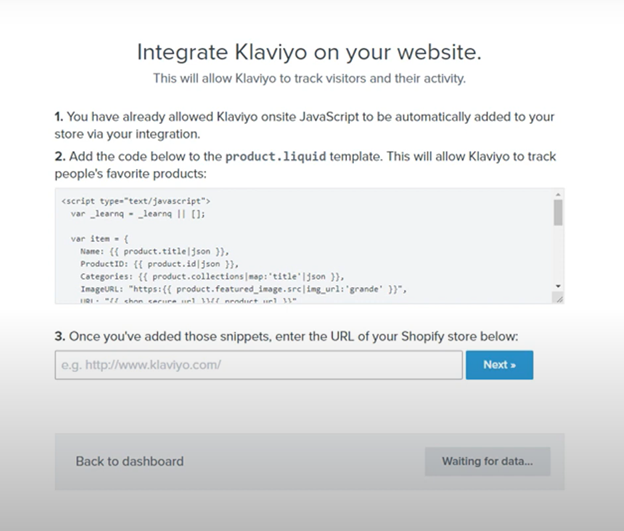
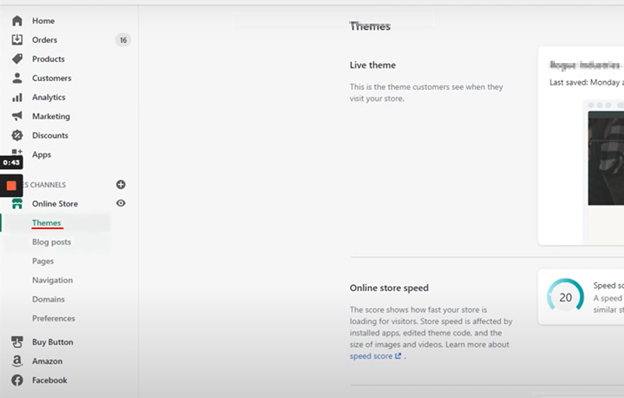
So, either click this code or right-click, copy and control. Then go to your Shopify store and click on the left-hand menu. You should notice an online store option that will take you to the themes page.
When you click on it, you should be sent to this website to discuss privacy concerns. I'm not going to click everything, so go ahead and click actions and modify code. It took a long time for me to load.
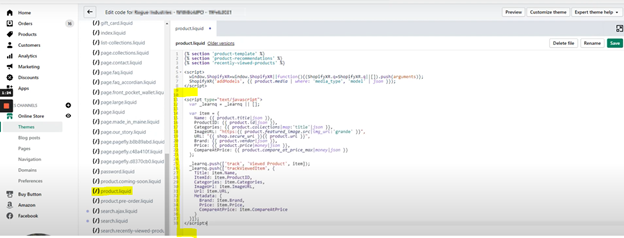
However, clicking on this edit code should take you to a page with all of the individual pages where you may manually modify the code. Now either go to the search files tab or scroll down until you find the product.liquid page. Then, paste the copied code to the bottom of the page.
Once you've completed this, click save and return to the Integrate with Klaviyo on your website page, where you may input the URL of the Shopify store to which you have inserted the custom code.
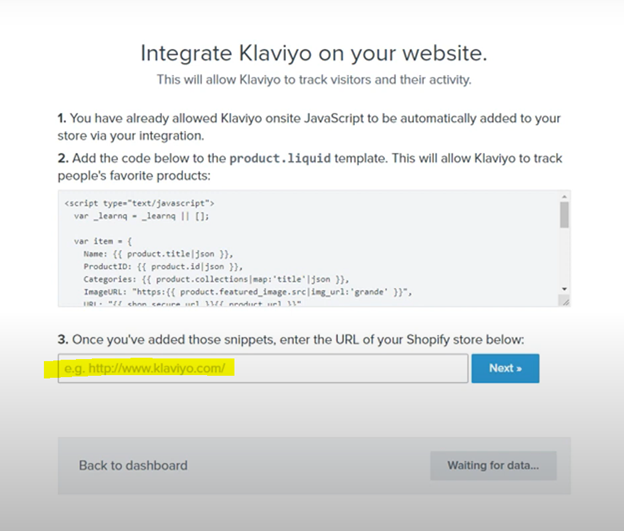
Go ahead and click the next button. That link should take you right to the webpage when you click it. If everything is in order and completed. Then there should be a line that says "data received."

If it doesn't, please double-check that you've copied and pasted everything correctly and that you're in the correct folder. If not, Klaviyo has a variety of other formats to choose from. They also provide tech support and customer care support that can assist you.
If you notice that the data has been received, go ahead and click next.
Now, go to your primary Klaviyo account to test whether this works. Then go to Activity Feed and look for a category named viewed product.
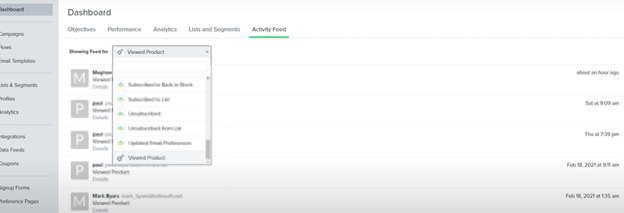
So, if you're doing a browser abandonment series to check who's looked at your product, this can be empty. All of these names have been blocked out because they are actual persons with actual email addresses from this website. However, if you're putting this up for the first time, this may be empty.
If you’d like to test this out, go to your actual website and click on one or two products. If it already indicates data is received, it's all set up.
One thing to keep in mind is that this occasionally just catches the names along with the emails. If you are not a subscriber or have never entered your email address into the system previously, it is possible that you will not be captured here. But, for the most part, it should collect a number of people who have visited your website, and they should begin to populate over time.
For your browser abandonment series, just make sure you link it up to the trigger filter, which is that people who have viewed a product will enter this flow.
Another thing to keep in mind is that if you're selling to the European Union, you must follow EU legislation and not send emails to random subscribers, non-subscribers, or those who haven't requested them. So, if you're catching users on your website who are in the EU but aren't subscribers, make sure you don't send them the email and leave them out of the process. If you don't want to be punished, just send these browser abandonment emails to non-EU subscribers.
It's done! I hope you took something away from today's lesson. Please contact us at info@grabdigital.co if you have any queries or require any assistance. Cheers!
Today, I'm going to show you how to set up Web tracking in your Klaviyo account so that you can track which consumers have been browsing your business.
To begin, head to the upper right hand corner of your Klaviyo account. Go ahead and select Set up Web Tracking from the dropdown menu.
So, either click this code or right-click, copy and control. Then go to your Shopify store and click on the left-hand menu. You should notice an online store option that will take you to the themes page.
When you click on it, you should be sent to this website to discuss privacy concerns. I'm not going to click everything, so go ahead and click actions and modify code. It took a long time for me to load.
However, clicking on this edit code should take you to a page with all of the individual pages where you may manually modify the code. Now either go to the search files tab or scroll down until you find the product.liquid page. Then, paste the copied code to the bottom of the page.
Once you've completed this, click save and return to the Integrate with Klaviyo on your website page, where you may input the URL of the Shopify store to which you have inserted the custom code.
Go ahead and click the next button. That link should take you right to the webpage when you click it. If everything is in order and completed. Then there should be a line that says "data received."
If it doesn't, please double-check that you've copied and pasted everything correctly and that you're in the correct folder. If not, Klaviyo has a variety of other formats to choose from. They also provide tech support and customer care support that can assist you.
If you notice that the data has been received, go ahead and click next.
Now, go to your primary Klaviyo account to test whether this works. Then go to Activity Feed and look for a category named viewed product.
So, if you're doing a browser abandonment series to check who's looked at your product, this can be empty. All of these names have been blocked out because they are actual persons with actual email addresses from this website. However, if you're putting this up for the first time, this may be empty.
If you’d like to test this out, go to your actual website and click on one or two products. If it already indicates data is received, it's all set up.
One thing to keep in mind is that this occasionally just catches the names along with the emails. If you are not a subscriber or have never entered your email address into the system previously, it is possible that you will not be captured here. But, for the most part, it should collect a number of people who have visited your website, and they should begin to populate over time.
For your browser abandonment series, just make sure you link it up to the trigger filter, which is that people who have viewed a product will enter this flow.
Another thing to keep in mind is that if you're selling to the European Union, you must follow EU legislation and not send emails to random subscribers, non-subscribers, or those who haven't requested them. So, if you're catching users on your website who are in the EU but aren't subscribers, make sure you don't send them the email and leave them out of the process. If you don't want to be punished, just send these browser abandonment emails to non-EU subscribers.
It's done! I hope you took something away from today's lesson. Please contact us at info@grabdigital.co if you have any queries or require any assistance. Cheers!

Jasper is an expert email marketer. He is passionate about helping sustainably driven businesses reach their marketing goes through beautiful, branded emails.
Find out exactly what your email channel is leaving on the table.

Email Marketing for Scaling DTC Brands


